Setting up the data sync
PLEASE NOTE: Veremark check data is synced at the time of check completion, the corresponding HiBob employee profile must exist at that time for the sync to be successful.
The check data that can be synced are:
- Status
- Completion date
- Role
- Criteria name
- Report URL
Video Walkthrough
This video provides a step-by-step guide on configuring the Veremark <> HiBob integration, enabling the seamless automatic synchronisation of check data into HiBob.
1. Obtain the partnerkey from Veremark
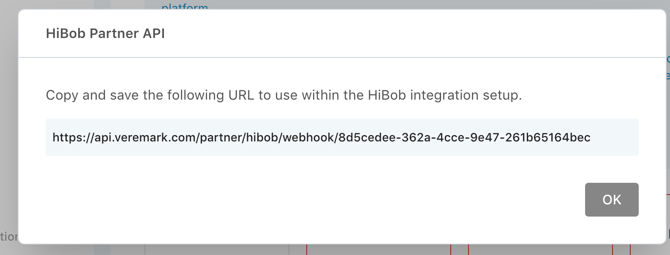
In Veremark, go to the Settings menu, select Integrations, and then click on the HiBob icon to generate your PartnerKey record for HiBob.
Make sure to copy and securely store this url, as it will be required for the next steps in the HiBob setup process. Once you have saved it, you can proceed with the configuration in HiBob.
2. Set up the Service User in HiBob
Navigate to Settings(1.) → Integrations(2.) → Manage (Service users)(3.) as shown on Fig.2.

Fig.2
Add a name to the new service user and click Done (Fig.3).
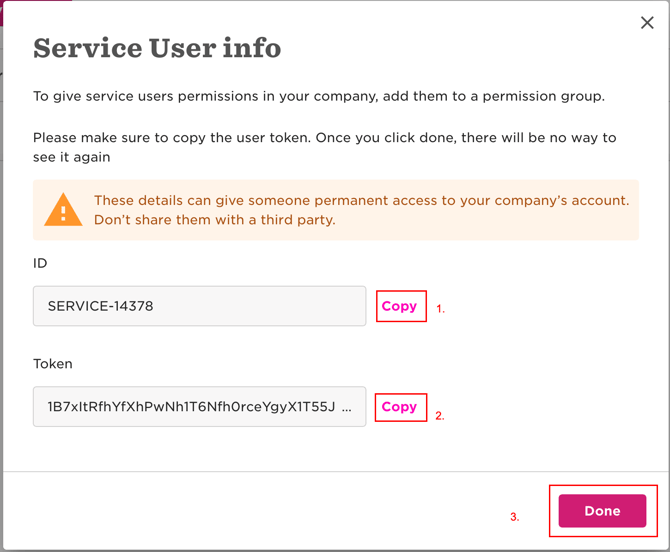
On the subsequent screen, be sure to carefully copy and securely store both the Service User ID and the Token Key. Please note that the Token Key cannot be retrieved later; if lost, you will need to create a new Service User to obtain a new key (see Fig. 4).
It is essential to promptly share the User ID and Token Key with your Veremark representative or send them to clientsupport@veremark.com for further assistance.
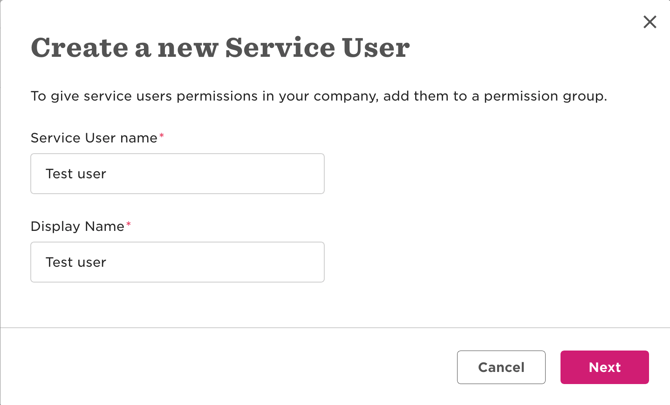
Fig.3
3. Create the new Data Categories
Proceed to add the specific data categories that you wish to synchronise from Veremark to HiBob.
To add a new category, go to Settings (1.) and select People's data fields (2.) within the Data management menu. Then, click on the +Add category (3.) button located in the top right corner, as illustrated in Fig.5.
 Fig.5 Create new category
Assign a name to the new category, such as "Veremark Checks," or choose a description that best fits your specific use case (Fig. 6).
 Fig.6 Add new category and give name
Once the category is created, scroll down to the list of categories and the new entry will be visible.
Drill down into the new category and create all the necessary custom fields with the corresponding field type (Fig.7)
IMPORTANT. Please use the exact same names as shown below:
Veremark status → type of Text
Veremark check completed → type of Date
Veremark criteria name → type of Text
Veremark report URL → type of Text
 Fig.7 Define data field names with the corresponding types
Creating a new field is shown below in Fig.8.
 Fig.8 Adding a new field
4. Permission Groups
Next, establish the necessary permissions for the service user you created earlier.
-
To access the Permission Groups, start from the HiBob home page and go to the Settings menu. Next, click on Account, and then select Permission Groups. This action will present you with a comprehensive list of the Permission Groups that are currently set up in your account.
-
Click the + Create group button located in the upper right corner. You can then provide a name for your new permission group.
-
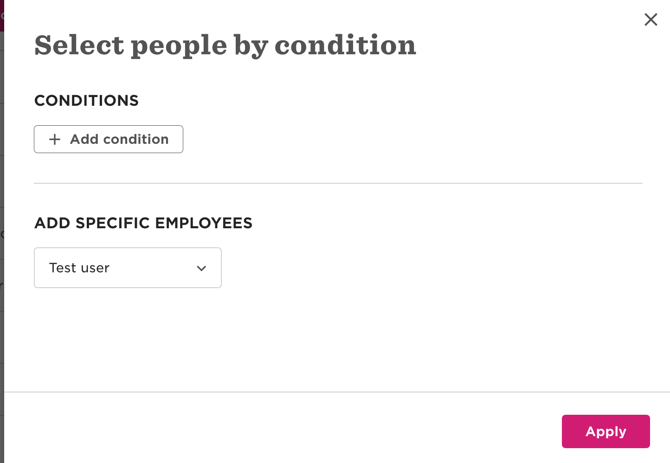
In the Group Members section, select the option to Specify People by Condition. Then, click on the Edit icon to modify the current conditions, and remove any existing conditions by using the 🗑️ icon next to each condition.
-
In the "Add Specific Employees" section, select the Service User that you created in the "Add Service User" section (Step 3). After selecting the user, click on "Apply," followed by "Create" and then "Confirm" to save your changes. This process is illustrated in Fig.9 and Fig.10.

Grant editing permissions for the newly created custom category to ensure data can be modified as needed (Fig.11).
-
Go to Settings → Account → Permission Groups
-
Find your group, drill into the record and click Edit Permissions (top right corner)
-
Click on the People’s data tab (1.)
-
Expand the People menu and find the name of your category (eg: Veremark Checks - 2.)
-
Click all the three checkboxes that correspond to that category on the right panel (3.) and save (top right corner).

Fig.11 Edit category permissions to enable data edit via APIs
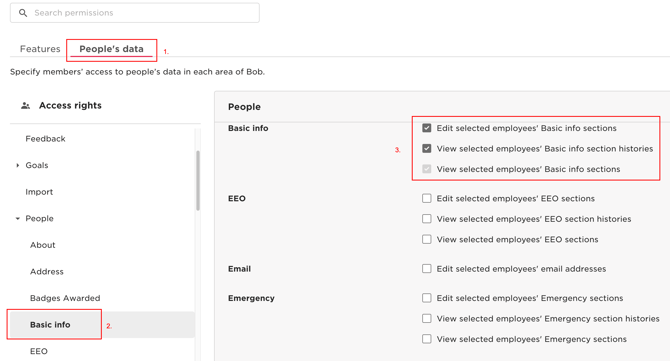
Now add permissions for editing/reading the Basic info of the employees (Fig.11a).
-
Go to Settings → Account → Permission Groups
-
Find you group, drill into the record and click Edit Permissions (top right corner)
-
Click on the People’s data tab (1.)
-
Expand the People menu and find the name of your category (eg: Basic Info - 2.)
-
Click all the three checkboxes agains that category on the right panel (3.) and Save (top right corner)
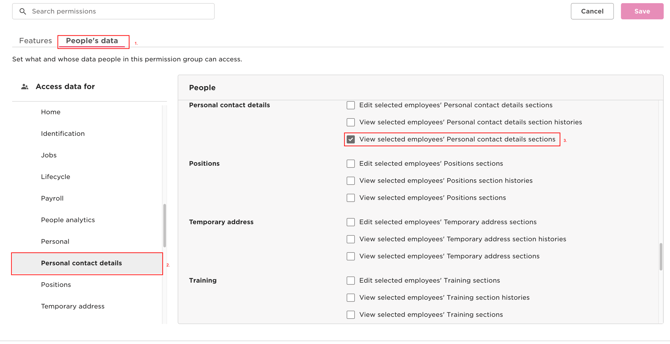
Now add permissions for editing/reading the Personal contact details of the employees (Fig.11b).
-
Go to Settings → Account → Permission Groups
-
Find you group, drill into the record and click Edit Permissions (top right corner)
-
Click on the People’s data tab (1.)
-
Expand the People menu and find the name of your category (eg: Personal contact details - 2.)
-
Click “View selected employees“ section checkboxe agains that category on the right panel (3.) and Save (top right corner)
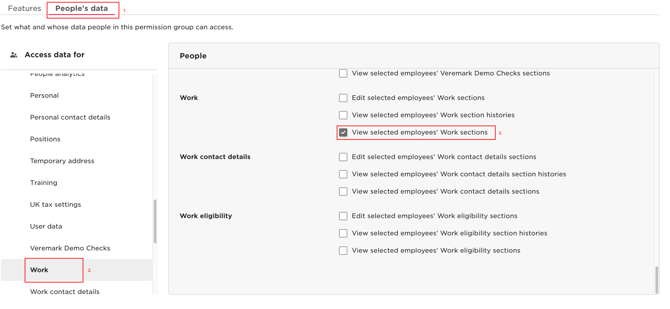
Add permissions for editing/reading the Work details of the employees (Fig.11c).
-
Go to Settings → Account → Permission Groups
-
Find you group, drill into the record and click Edit Permissions (top right corner)
-
Click on the People’s data tab (1.)
-
Expand the People menu and find the name of your category (eg: Work - 2.)
-
Click “View selected employees“ section checkboxe agains that category on the right panel (3.) and Save (top right corner)
The Output
The synchronised data fields will appear similar to the example shown below (the exact names and descriptions will vary based on your specific inputs) (fig.12).
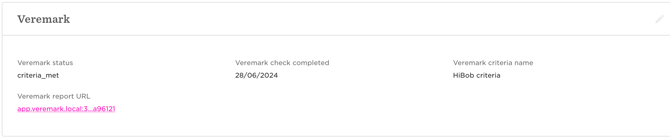
Fig.12 Synced data